A deep dive into datacenter technologies like virtualization, automation, backup, and networking – bridging the gap between enterprise-grade solutions and practical implementations for SMBs and/or home labs.
Now that the infrastructure is ready, it’s time to add a backup source. That´s why the next logical step is adding an ESX or vCenter to VBR. Since my VMware homelab is currently undergoing major restructuring, I only have a single ESX server running a few VMs. We’re now backing these up regularly using Veeam Veeam VBR.
It doesn’t matter whether the source is a complete vCenter or just a single ESX server, the procedure is 100% the same.
In the third part we bring it all together. We add the Infrastructure Appliance to the VBR server. Then we set it up as a hardened repo, which will later on serve as our primary backup target.
In order to create the hardened repo in your VBR appliance, two steps need to be done. First, the newly installed server is added to VBR as a managed server. Then, the actual repository is created, and all properties such as concurrency and immutability are configured.
To do this, we first log in to the web interface of the VBR server.
In the second part of the Veeam 13 series, I demonstrate how to install a hardened repo on an HPE server using the new infrastructure ISO file from Veeam. Since the system is intended to serve as the primary backup target, I naturally used a dedicated physical server rather than a VM.
This is the first post of a series that will guide you through in the installation and setup of Veeam 13. Every good IT infrastructure also needs a good, multi-level backup system. As a vExpert, you not only get VMware by Broadcom licenses for your HomeLab, but you can also obtain an NFR license from Veeam with a one-year term and all features.
When using Overlay networks within your NSX environment, you need at least two edge nodes. VMware´s preferred way of deployment is VMs, as it´s the easiest and most comfortable way of deployment and management.
To enhance network flow and ensure high data rates, I decided to have a look on bare metal edges.
This two-post series will show how to basic install and join them into a VCF NSX manager.
While rolling out a new Workload domain, the SDDC manager got stuck in a loop of deploying the NSX appliances and deleting them instantly after the deployment finished. The interesting thing was that one out of the three VMs got deployed and started without problems.
The cause of this could be found in the domainmanager logfile on the SDDC manager host
Powering on VM: ***-nsx01a
[..] -
[..] - Task Completed
[..] - Error: Task failed on server: The host does not have sufficient memory resources to satisfy the reservation.
[..] - Deleting VM: ***-nsx01a
[..] - Warning:
[..] -  - The manifest is present but user flag causing to skip it
[..] - Completed with errors on host ***
[..] ERROR [vcf_dm,677263b484ddb203cdedfa721556dc85,fe4c] [c.v.v.c.f.p.n.a.DeployNsxtManagerAction,dm-exec-1]  Deployment of NSX Manager failed using OVF tool
[..] DEBUG [vcf_dm,677263b484ddb203cdedfa721556dc85,fe4c] [c.v.v.c.f.p.n.a.DeployNsxtManagerAction,dm-exec-1]  Found error message - [Error: Task failed on server: The host does not have sufficient memory resources to satisfy the reservation.]
The management domain was also used to run other “Management VMs”. It slightly ran out of “reservable memory”. As the NSX VMs get a memory resource reservation, only the first VM got enough resources for the reservation and could be powered up, but there wasn´t enough for the latter two.
After increasing the memory of the ESXi Hosts the deployment could be finished without any problems.
The other day I wanted to add some additional ESXi hosts to my lab VCF installation but failed due to the following error
Host validation failed, invalid input. Please check logs for more details
You can remove the validation failed host and proceed with commissioning for the remaining hosts.
The mentioned logfile can be found inside the VCF SDDC manager appliance.
To access the logfile you first have to open an SSH session to your appliance and log in with the vcf user and the password you have set during installation.
The logfile for the host operations is stored here:
I placed a tail -f on the logfile and retried the host validation set. In the output I found my problem, it turned out I had a typo in my DNS configuration and the host could just not be found.
java.net.UnknownHostException: esx-vcf-wld01.sddc.local: Name or service not known
After fixing DNS the host validation succeeded and the hosts could be added to the SDDC manager.
When using NSX a quite common task is applying tags to VMs. This can be done in several ways, in this post I´m showing how to accomplish that task via the RESTapi of NSX 4.1.2
The API calls and all other scripts in this post were run with these versions: – VMware NSX Version 4.1.2.1.0.22667789
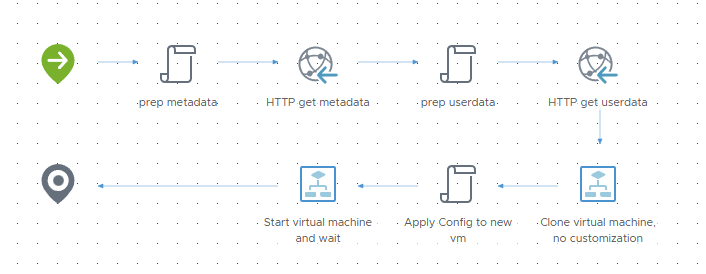
The automatic and unattended installation of virtual machines can be achieved with several techniques. In this series, I´ll show the approach of using CloudInit together with VMware Aria Automation Orchestrator. This will be realized by the use of Guest OS Customization of the specific VM.
In Part 3 we´ll be finally deploying some VMs with a new designed workflow.